🚀 Beag Base Setup Guide
A complete step-by-step guide to set up your SaaS application using Beag Base boilerplate with Beag.io authentication and subscription management.
⚡ Quick Access for Experienced Developers
Skip the tutorial and get straight to the repositories:
📋 Prerequisites
Before you begin, make sure you have:
- Node.js 18+ installed (Download)
- Python 3.11+ installed (Download)
- PostgreSQL 12+ installed (Download)
Windows: Download installer from PostgreSQL Windows
macOS: brew install postgresql@15
Linux: sudo apt install postgresql
- Git installed
- Beag.io Account (Sign up)
- GitHub Account (for using template repositories)
- Stripe Account (for payment processing)
🪟 Windows Users: This guide uses bash scripts (.sh files) that don't run natively on Windows. You have three options:
1. WSL2 (Recommended) - Install Windows Subsystem for Linux
2. Git Bash - Comes with Git for Windows
3. Manual Commands - Use PowerShell/Command Prompt with manual commands
🛠️ Local Development Setup
Follow these steps in order: Backend → Frontend → Admin
1Backend Setup
# Create Beag App
1. Log in to Beag.io Dashboard
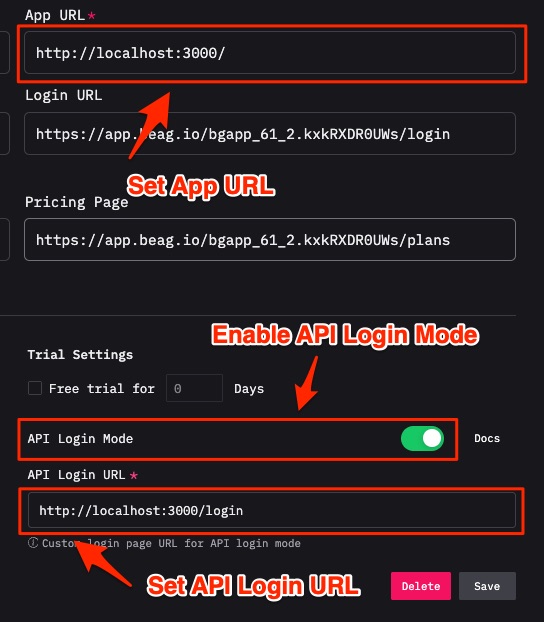
2. Create a new app:
- Enable API Login Mode
- Set App URL: http://localhost:3000
- Set API Login URL: http://localhost:3000/login
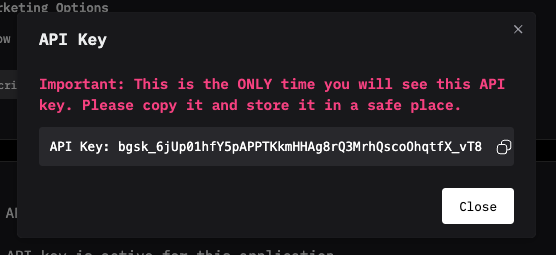
3. Generate API Key:
- Click "Generate API Key"
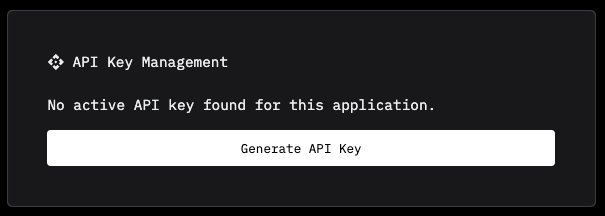
- Copy and save your API Key (you'll need this later)
# Clone and Setup Backend
1. Go to the Backend Repository: https://github.com/endlessbank/beag-base-backend
2. Click "Use this template" → "Create a new repository"
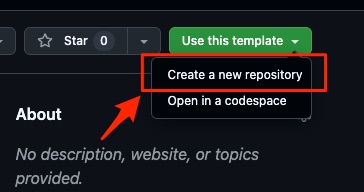
3. Clone your new repository
git clone [YOUR_BACKEND_REPO_URL]
cd [backend-folder-name]
4. Set up the database
./setup-database.sh
Enter a unique database name when prompted (e.g., my_saas_db)
5. The script will automatically update your .env file with DATABASE_URL
🪟 Windows (PowerShell) - Manual setup:
psql -U postgres
CREATE USER my_saas_db_user WITH PASSWORD 'your_password';
CREATE DATABASE my_saas_db OWNER my_saas_db_user;
\q
# Then manually add to .env:
# DATABASE_URL=postgresql+pg8000://my_saas_db_user:your_password@localhost:5432/my_saas_db
# Configure Backend Environment
1. Open .env file in your editor
2. Replace BEAG_API_KEY with the API key you copied from Beag.io:
BEAG_API_KEY=your_actual_api_key_here
# Start Backend Server
# Run the backend
./start.sh
✅ Success indicators:
- "Database connection successful!"
- "Starting FastAPI server with background worker..."
- API available at http://localhost:8000/docs
🪟 Windows (PowerShell) - Manual commands:
python -m venv venv
.\venv\Scripts\activate
pip install -r requirements.txt
alembic upgrade head
uvicorn app.main:app --reload
# Verify Backend
- Open http://localhost:8000/docs in your browser
- You should see the Swagger API documentation
2Frontend Setup
# Clone and Setup Frontend
1. Go to the Frontend Repository: https://github.com/endlessbank/beag-base-frontend
2. Click "Use this template" → "Create a new repository"
3. Clone your new repository
git clone [YOUR_FRONTEND_REPO_URL]
cd [frontend-folder-name]
# Configure Frontend Environment
1. Create .env.local file:
cp .env.example .env.local
2. Edit .env.local and update:
# Your Beag App ID (get from Beag.io dashboard)
NEXT_PUBLIC_BEAG_ID=bgapp_xxxxx

# Your Stripe Customer Portal URL
NEXT_PUBLIC_STRIPE_PORTAL_URL=https://billing.stripe.com/p/login/xxxxx

# Backend URL (keep as is for local development)
NEXT_PUBLIC_BACKEND_URL=http://localhost:8000
# Add Beag Script
1. Get your Beag script from Beag.io dashboard:
- Go to your app settings
- Click "Script Tag" button
- Copy the code from step 1
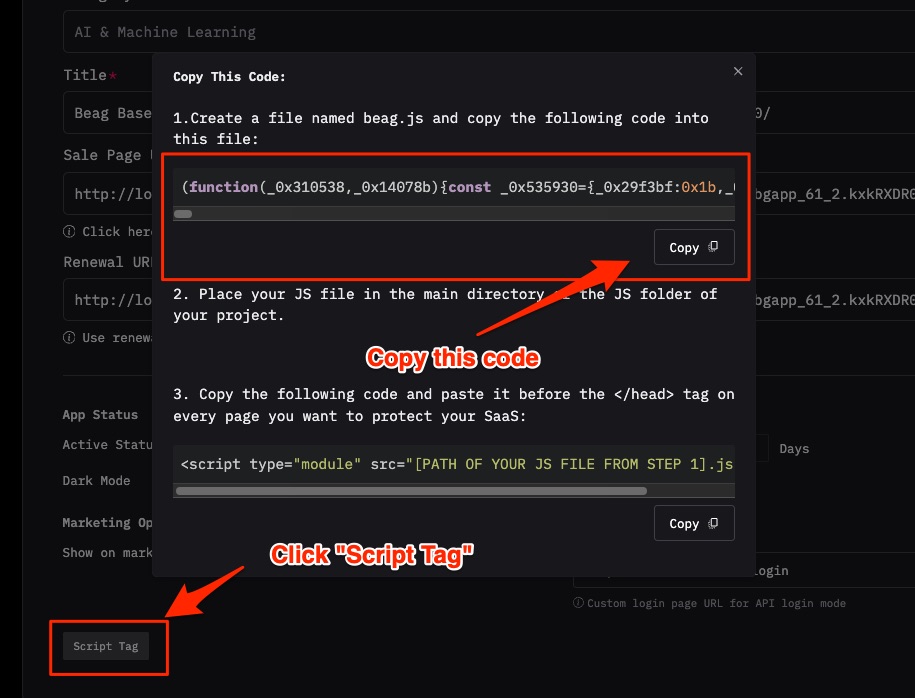
2. Update /public/beag.js:
- Open /public/beag.js
- Delete all existing content
- Paste your Beag JavaScript code
- Save the file
⚠️ Important: The file must contain actual JavaScript code, not an HTML script tag!
# Start Frontend
# Run the frontend
./start.sh
✅ Success indicators:
- "ready started server on 0.0.0.0:3000"
- No errors in the console
🪟 Windows (PowerShell/Command Prompt):
npm install
npm run dev
3Testing Your Setup
# Create a Test User
1. In Beag.io Dashboard:
- Create a free plan
- Purchase it using your email (for testing)
2. Test Login:
- Go to http://localhost:3000/login
- Enter your email
- Enter the OTP sent to your email
- You should be redirected to the dashboard
# Verify Everything Works
1. Check Frontend Dashboard (http://localhost:3000):
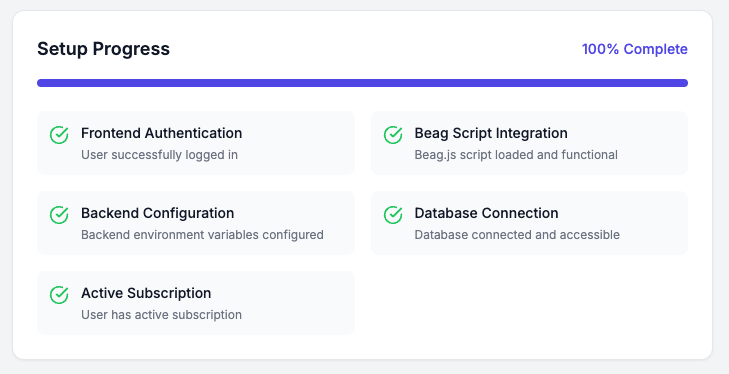
All checkboxes should be green ✅ indicating:
- ✅ Frontend Authentication
- ✅ Beag Script Integration
- ✅ Backend Configuration
- ✅ Database Connection
- ✅ Active Subscription
4Admin Setup
# Clone and Setup Admin
1. Go to the Admin Repository: https://github.com/endlessbank/beag-base-admin
2. Click "Use this template" → "Create a new repository"
3. Clone your new repository
git clone [YOUR_ADMIN_REPO_URL]
cd [admin-folder-name]
# Configure Admin Environment
1. Create .env.local file:
cp .env.example .env.local
2. Edit .env.local and set admin credentials:
# Admin login credentials (choose your own)
ADMIN_USERNAME=admin
ADMIN_PASSWORD=your_secure_password_here

# Backend URL
NEXT_PUBLIC_BACKEND_URL=http://localhost:8000
# Start Admin Panel
# Run the admin panel
./start.sh
✅ Success indicators:
- "ready started server on 0.0.0.0:3001"
- No errors in the console
🪟 Windows (PowerShell/Command Prompt):
npm install
npm run dev
# Test Admin Access
1. Go to http://localhost:3001
2. Log in with your admin credentials
3. You should see the user management dashboard
🚀 Production Deployment
Ready to go live? Here's how to deploy your complete SaaS stack to production.
# Backend Deployment (Render)
1. Create PostgreSQL Database
In Render Dashboard: New → PostgreSQL
Wait for database creation (~5 minutes) and copy the Internal Database URL
2. Deploy Backend
Create Web Service, connect your backend GitHub repository
Set Start Command:
alembic upgrade head && uvicorn app.main:app --host 0.0.0.0 --port $PORT
Add Environment Variables:
BEAG_API_KEY=your_production_api_key
DATABASE_URL=[Internal Database URL from step 1]
FRONTEND_URL=https://your-app.vercel.app
ADMIN_URL=https://your-admin.vercel.app
ENVIRONMENT=production
# Frontend Deployment (Vercel)
1. Create New Project in Vercel
2. Import your frontend GitHub repository
3. Add Environment Variables:
NEXT_PUBLIC_BACKEND_URL=https://your-backend.onrender.com
NEXT_PUBLIC_BEAG_ID=bgapp_xxxxx
NEXT_PUBLIC_STRIPE_PORTAL_URL=https://billing.stripe.com/p/login/xxxxx
# Admin Deployment (Vercel)
1. Create New Project in Vercel
2. Import your admin GitHub repository
3. Add Environment Variables:
NEXT_PUBLIC_BACKEND_URL=https://your-backend.onrender.com
ADMIN_USERNAME=production_admin
ADMIN_PASSWORD=very_secure_production_password
⚠️ Important: Remove any trailing slashes (/) from URLs!
🎉 Success Checklist
Congratulations! 🎊 Your SaaS application is now ready with authentication, subscriptions, and admin management!
📚 Additional Resources
- Beag.io Documentation: Beag User's Guide
- Repository READMEs: Each repository has detailed documentation
- API Documentation: http://localhost:8000/docs (when backend is running)
Ready to Build Your SaaS?
Get started with Beag.io and launch your SaaS faster!
Start 7-day free trial →